 Hyundai Azera: Inhibitor Switch Repair procedures
Fifth generation HG (2011–2026) / Hyundai Azera 2011-2026 Service Manual / Automatic Transaxle System / Automatic Transaxle Control System / Inhibitor Switch Repair procedures
Hyundai Azera: Inhibitor Switch Repair procedures
Fifth generation HG (2011–2026) / Hyundai Azera 2011-2026 Service Manual / Automatic Transaxle System / Automatic Transaxle Control System / Inhibitor Switch Repair procedures
| Inspection |
|

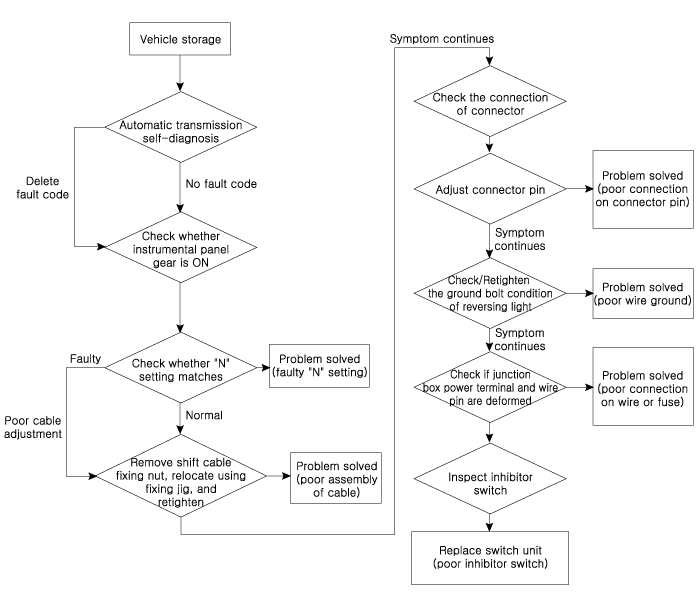
| 1. |
Inspect DTC code. |
| 2. |
Inspect whether N setting matches.
|
| 3. |
Inspect shift cable separation.
|
| 4. |
Inspect whether connector is connected.
|
| 5. |
Inspect ground condition on reversing light circuit.
|
| 6. |
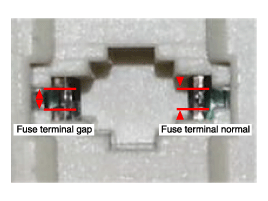
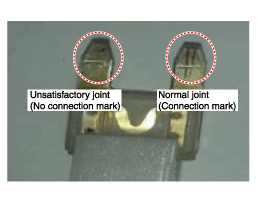
Inspect wiring connection on junction box power terminal and fuse lamp.
|
| 7. |
Inspect inhibitor switch signal.
|
| Removal |
| 1. |
Make sure vehicle does not roll before setting room side
shift lever and Automatic Transaxle(AT) side manual control lever to "N"
position. |
| 2. |
Remove the battery and the battery tray.
|
| 3. |
Remove the air cleaner assembly.
|
| 4. |
Remove the shift cable mounting nut (B).
|
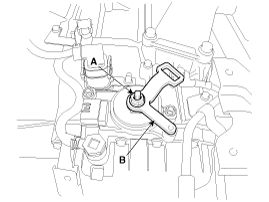
| 5. |
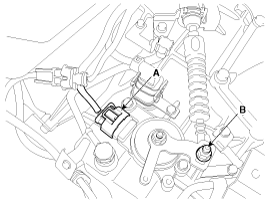
Disconnect the inhibitor switch connector (A).
|
| 6. |
Remove the manual control lever (B) and the washer after removing a nut (A).
|

| 7. |
Remove the inhibitor assembly (A) after removing the bolts (2ea).
|

| Installation |
| 1. |
Installation is the reverse of removal. |
 Inhibitor Switch Troubleshooting
Fault Diagnosis
Fault Diagnosis for Symptom
Major Symptom Expected Cause Items to Check and Measures Shift lever not operating Gear not marked on cluster Shock occurs wh ...
 Shift Lever Components and Components Location
Components
1. Shift lever knob2. Shift lever assembly 3. Control cable assembly4. Manual control lever (T/M side)
...
See also:
2. Evaporative emission control (including ORVR: Onboard Refueling Vapor Recovery)
system
The Evaporative Emission Control System is designed to prevent fuel vapors from
escaping into the atmosphere.
(The ORVR system is designed to allow the vapors from the fuel tank to be loaded
into a ...
Crash Pad Side Cover Repair procedures
Replacement
•
When prying with a flat-tip screwdriver, wrap it with
protective tape, and apply protective tape around the related parts, to
prevent damage.
•
...
Cluster Fascia Panel Repair procedures
Replacement
•
When prying with a flat-tip screwdriver, wrap it with
protective tape, and apply protective tape around the related parts, to
prevent damage.
•
...
Categories
Hyundai Azera Manuals
