
 Hyundai Azera: Coolant Repair procedures
Fifth generation HG (2011–2026) / Hyundai Azera 2011-2026 Service Manual / Engine Mechanical System / Cooling System / Coolant Repair procedures
Hyundai Azera: Coolant Repair procedures
Fifth generation HG (2011–2026) / Hyundai Azera 2011-2026 Service Manual / Engine Mechanical System / Cooling System / Coolant Repair procedures
Fifth generation HG (2011–2026) / Hyundai Azera 2011-2026 Service Manual / Engine Mechanical System / Cooling System / Coolant Repair procedures
| Replacement And Air Bleeding |
Never remove the radiator cap when the engine is hot. Serious
scalding could be caused by hot fluid under high pressure escaping from
the radiator. |

When pouring engine coolant, be sure to shut the relay box
lid and not to let coolant spill on the electrical parts or the paint.
If any coolant spills, rinse it off immediately. |

| 1. |
Make sure the engine and radiator are cool to the touch. |
| 2. |
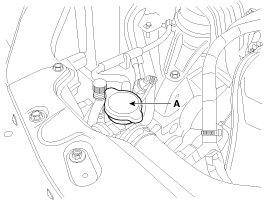
Remove the radiator cap (A).
|
| 3. |
Remove the engine room under cover. |
| 4. |
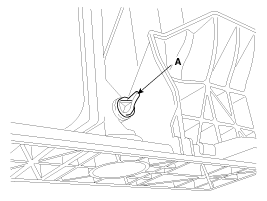
Loosen the drain plug (A), and drain the coolant.
|
| 5. |
Tighten the radiator drain plug securely. |
| 6. |
Remove, drain and reinstall the reservoir.
(Refer to Cooling System - "Reservoir Tank")
Fill the tank halfway to the F mark with water, then up to the F mark with antifreeze. |
| 7. |
Fill the radiator with water through the radiator cap and tighten the cap.
|
| 8. |
Start the engine and allow to come to normal operating
temperature. Wait for the cooling fans to turn on several times.
Accelerate the engine to aid in purging trapped air. Shut engine off. |
| 9. |
Wait until the engine is cool. |
| 10. |
Repeat steps 1 to 8 until the drained water runs clear. |
| 11. |
Fill fluid mixture with coolant and water(5 : 5) (Tropical
region – 4:6) slowly through the radiator cap. Push the upper/lower
hoses of the radiator so as bleed air easily.
|
| 12. |
Start the engine and run coolant circulates. |
| 13. |
When the cooling fan operates and coolant circulates, refill coolant through the radiator cap. |
| 14. |
Repeat step.11 until the cooling fan 3 ~ 5times and bleed air sufficiently out of the cooling system. |
| 15. |
Install the radiator cap and fill the reservoir tank to the "F" line with coolant. |
| 16. |
Run the vehicle under idle until the cooling fan operates 2 ~ 3 times. |
| 17. |
Stop the engine and wait coolant gets cool. |
| 18. |
Repeat 10 to 15 until the coolant level doesn't fall any more, bleed air out of the cooling system.
|
 Cooling System
...
 Heater Hose Components and Components Location
Components
1. Heater hose (Inlet)2. Heater hose (Outlet)3. Clamp
...
See also:
Body Control Module (BCM) Repair procedures
Removal
1.
Disconnect the negative (-) battery terminal.
2.
Remove the crash pad lower panel.
(Refer to Body - "Crash Pad Lower Panel")
3.
Remove the Reinforcing panel after loosening the ...
Telematics Unit (TMU) Components and Components Location
Component
...
Rear Seat Belt Retractor Repair procedures
Replacement
•
When installing the belt, make sure not to damage the retractor.
1.
Remove the rear package tray trim.
(Refer to Interior Trim - "Rear Package Tray ...
Categories
Hyundai Azera Manuals

© 2011-2026 Copyright www.hgmanual.com