| Service Point Target Auto Calibration (SPTAC) |
This procedure provides a way to calibrate the camera by
having the service technician align the car to a well lit simulated
straight road target; preferably wall mounted.
The LDWS camera will have a "System Out of Calibration" DTC set if not operating within specified tolerances.
The LDWS will be supplied for field service replacement with
the "System Calibration Requried / Variant Coding Error" DTC set if it
is a replacement part delivered directly from supplier manufacturing.
| 1. |
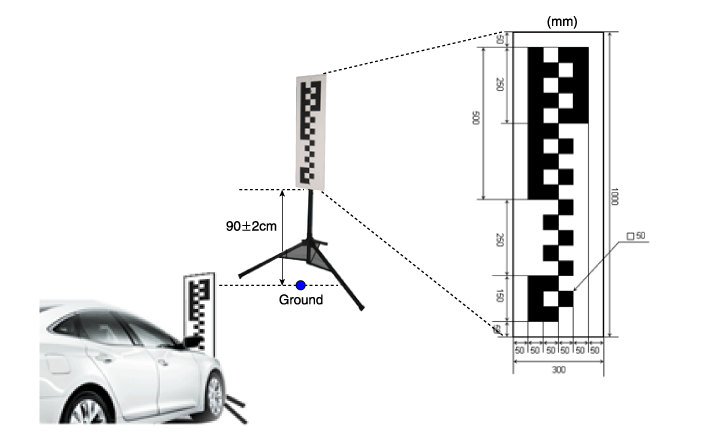
Guidelines for Selecting a Suitable Target
In order for LDWS Service Calibration-Static routine to complete successfully, the following conditions are required:
| A. |
Target (SST : 09890-3V100) surface must be perpendicular to
the camera in both horizontal and vertical orientation to maintain
maximum of 1° roll. |
| B. |
Target to be mounted to rigid backer material to maintain flatness requirements. |
| C. |
Target must have reflective (not faded or poorly painted) markings not to represent lane features. |
| D. |
Target to be 30cm wide by 100cm tall. |
| E. |
Mounting area must NOT have cross hatch patterns or textual markings near the target. |
| F. |
Target should be well lit for optimal performance using
non-fluctuating illumination. There shall be no continuous shadows cast
on the target. |
|
| 2. |
Service Point Target Auto Calibration Procedure
| (1) |
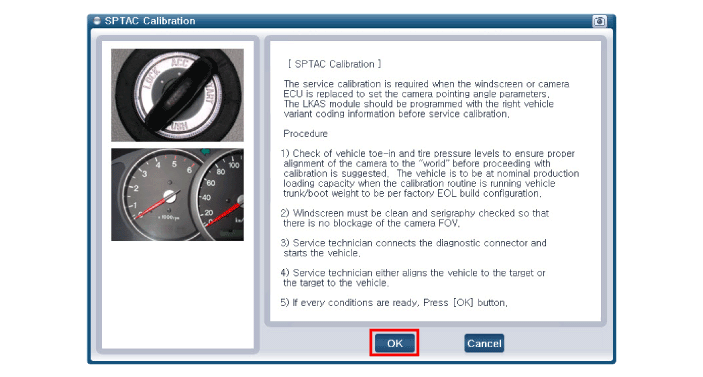
Check of vehicle toe-in and tire pressure levels to ensure
proper alignment of the camera to the "world” before proceeding with
calibration is suggested. The vehicle is to be at nominal production
loading capacity when the calibration routine is running. |
| (2) |
Windscreen must be clean and serigraphy checked so that there is no blockage of the camera. |
| (3) |
Service technician connects the diagnostic connector and
starts the vehicle. The camera module should not be activated by
pressing the switch. |
| (4) |
The service calibration routine may not run correctly if any system level fault is active. |
| (5) |
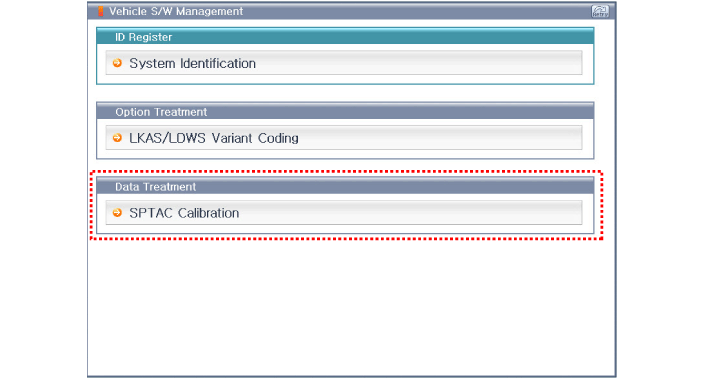
If working with a replacement ECU: the service technician initiates the SPTAC Reset configuration. |
| (6) |
Service technician either aligns the vehicle to the target or the target to the vehicle.
| A. |
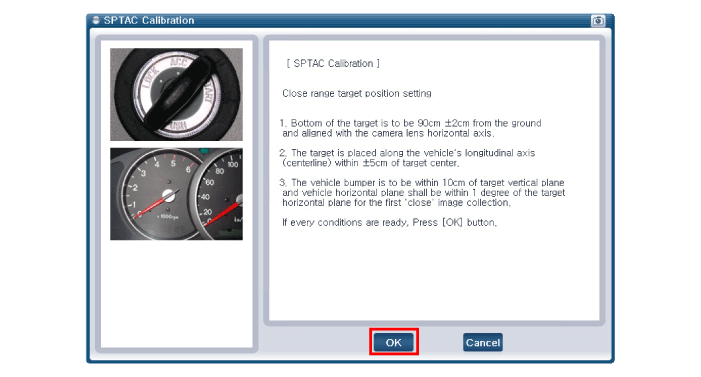
Bottom of the target is to be 90cm ±2cm from the ground and aligned with the camera lens horizontal axis. |
| B. |
The target is placed along the vehicle’s longitudinal axis (centerline) within ±5cm of target center. |
| C. |
The calibration target has to be placed at the 2.7m distance from the front wheel center (1.74m distance from the bumper) 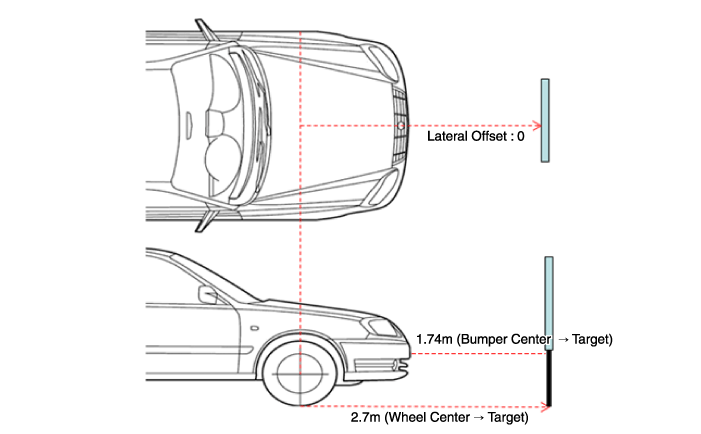
|
|
| (7) |
Technician ensures target placement location and check the "OK" message on the diagnostic tool (GDS). |
| (8) |
Clear the all of the DTCs. |
|
Drive Test
|
May not activate normally in case of the following conditions.
| - |
In case lane is not visible due to glare or heavy rain. |
| - |
In case the road is covered with snow. |
| - |
In case puddle on the road surface reflects street light or head light from oncoming vehicle. |
| - |
In case of blocking object such as sidewalk on the side of the road. |
| - |
In case of there is trace of more than one lane due to road repair. |
| - |
In case of distance with vehicle in front is very short. |
| - |
Be sure to run drive test to check normal operation after performing optical angle test. |
| - |
Drive on straight line road (longer than 500m) 2 white or
yellow lane marks at speed over 60Km/h, and check when the alert is
activated as you intentionally steer close to the lane mark. |
| - |
LDWS operates normally if the lane mark segment space is less than 8m. |
| - |
LDWS activates at vehicle speed above 60Km/h. |
| - |
Perform drive test on car-only road or on a highway. |
|
Description
Block Diagram
LDWS is composed of below units
NoItemFunctionPosition1LDWS UNIT
1.
Lane Departure Warning System (LDWS) : Detects drive lane in
front and engages warning function i ...
See also:
Selecting Presets
Press the key
Select
The 6 preset buttons are displayed. Press the
~
key to play the desired preset.
...
Troubleshooting
Troubleshooting
Problem Symptoms Table
Use the table below to help you find the cause of the
problem. The numbers indicate the priority of the like cause of the
problem. Check each part in o ...
Center Fascia Panel Components and Components Location
Component Location
1. Center fascia panel
...
 Hyundai Azera: Repair procedures

 Description and Operation
