 Hyundai Azera: Timing Chain Repair procedures
Fifth generation HG (2011–2026) / Hyundai Azera 2011-2026 Service Manual / Engine Mechanical System / Timing System / Timing Chain Repair procedures
Hyundai Azera: Timing Chain Repair procedures
Fifth generation HG (2011–2026) / Hyundai Azera 2011-2026 Service Manual / Engine Mechanical System / Timing System / Timing Chain Repair procedures
Fifth generation HG (2011–2026) / Hyundai Azera 2011-2026 Service Manual / Engine Mechanical System / Timing System / Timing Chain Repair procedures
| Removal |
| 1. |
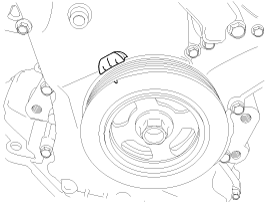
Set No.1 cylinder to TDC/compression.
|

| 2. |
Remove the timing chain cover.
(Refer to Timing System - "Timing Chain Cover")
|


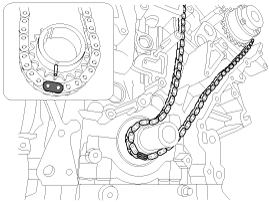
| 3. |
Remove the oil pump chain cover (A).
|
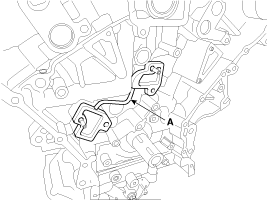
| 4. |
Remove the oil pump chain tensioner assembly (A).
|
| 5. |
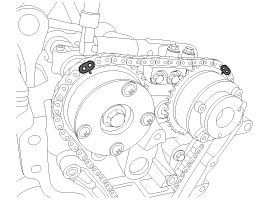
Release the ratchet by pulling the link down using a thin
rod. Compress the piston and then insert a stopper pin into the hole on
the ratchet to hold the compressed piston.
|
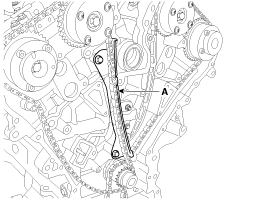
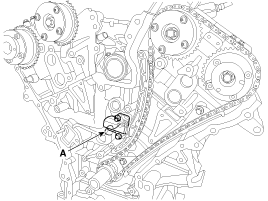
| 6. |
Remove the RH timing chain cam to cam guide (A).
|

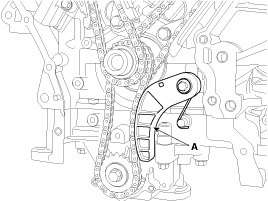
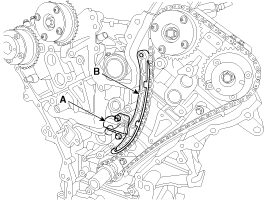
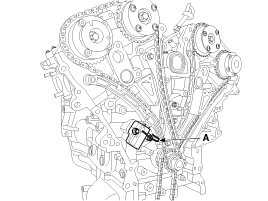
| 7. |
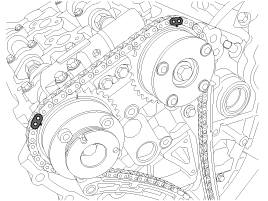
Remove the RH timing chain auto tensioner (A) and the RH timing chain tensioner arm (B).
|
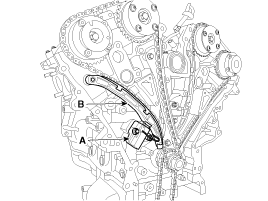
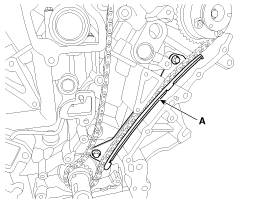
| 8. |
Remove the RH timing chain guide (A).
|
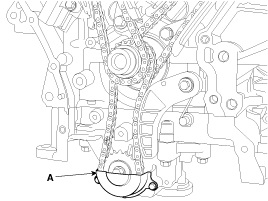
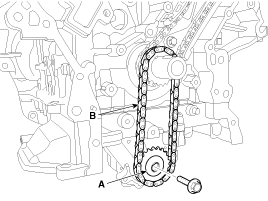
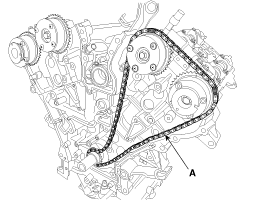
| 9. |
Remove the RH timing chain (A).
|
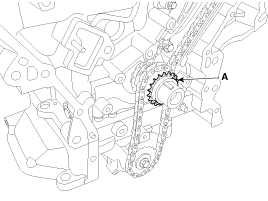
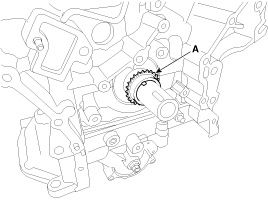
| 10. |
Remove the crankshaft sprocket (A) ( RH camshaft drive).
|
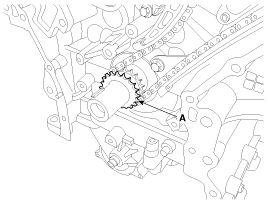
| 11. |
Remove the oil pump chain sprocket (A) and oil pump chain (B).
|
| 12. |
Remove the crankshaft sprocket (A) (Oil pump drive).
|
| 13. |
Release the ratchet by pulling the link down using a thin
rod. Compress the piston and then insert a stopper pin into the hole on
the ratchet to hold the compressed piston.
|
| 14. |
Remove the LH timing chain cam to cam guide (A).
|
| 15. |
Remove the LH timing chain auto tensioner (A) and LH timing chain tensioner arm (B).
|
| 16. |
Remove the LH timing chain guide (A).
|
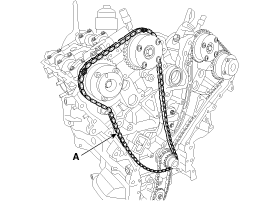
| 17. |
Remove the LH timing chain (A).
|
| 18. |
Remove the crankshaft sprocket (A). (LH camshaft drive).
|
| 19. |
Remove the tensioner adapter assembly (A).
|
| Inspection |
Sprockets, Chain Tensioner, Chain Guide, Chain Tensioner Arm
| 1. |
Check the camshaft sprocket and crankshaft sprocket for abnormal wear, cracks, or damage. Replace as necessary |
| 2. |
Inspect the tensioner arm and chain guide for abnormal wear, cracks, or damage. Replace as necessary. |
| 3. |
Check that the tensioner piston moves smoothly when the ratchet pawl is released with thin rod. |
Drive belt, Idler, Belt tensioner pulley
| 1. |
Check the idler for excessive oil leakage, abnormal rotation or vibration. Replace if necessary. |
| 2. |
Check the belt tensioner for excessive dust, crack, and damage. Replace if necessary. |
| 3. |
Check belt for maintenance and abnormal wear of V-ribbed part. Replace if necessary. |
| 4. |
Check the pulleys for vibration in rotation, oil or dust deposit of V-ribbed part. Replace if necessary. |
| Installation |
| 1. |
Install the jack to the edge of upper oil pan to support the engine.
|
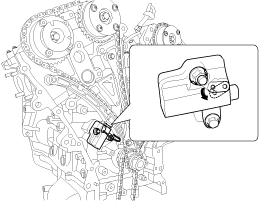
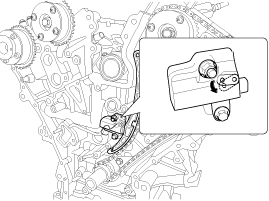
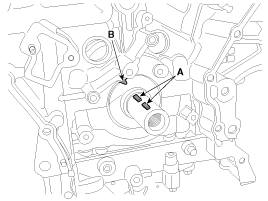
| 2. |
The key (A) of crankshaft should be aligned with the timing
mark (B) of block. As a result of this, the piston of No.1 cylinder is
placed at the top dead center on compression stroke.
|
| 3. |
Install the tensioner adapter assembly (A).
|
| 4. |
Install the crankshaft sprocket (A). (LH camshaft drive).
|
| 5. |
Install the LH timing chain (A).
|
| 6. |
Install the LH timing chain guide (A).
|
| 7. |
Install the LH timing chain auto tensioner (A) and LH timing chain tensioner arm (B).
|
| 8. |
Install the LH timing chain cam to cam guide (A).
|
| 9. |
Pull out the pins of LH timing chain auto tensioner.
|
| 10. |
Install the crankshaft sprocket (A) (Oil pump drive).
|
| 11. |
Install the oil pump chain sprocket (A) and oil pump chain (B).
|
| 12. |
Install the RH timing chain (A).
|
| 13. |
Install the RH timing chain guide (A).
|
| 14. |
Install the RH timing chain auto tensioner (A) and the RH timing chain tensioner arm (B).
|
| 15. |
Install the RH timing chain cam to cam guide (A).
|
| 16. |
Pull out the pins of RH timing chain auto tensioner.
|
| 17. |
Install the oil pump chain tensioner assembly (A).
|
| 18. |
Install the oil pump chain cover (A).
|
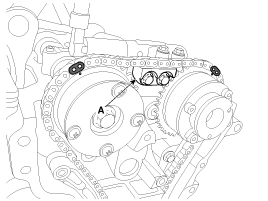
| 19. |
After rotating the crankshaft 2 revolutions in regular direction (clockwise viewed from front), confirm the timing mark.
|
| 20. |
Install the timing chain cover.
(Refer to Timing System - "Timing Chain Cover") |
| 21. |
Install the other parts reverse order of removal.
|
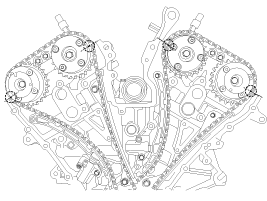
 Timing Chain Components and Components Location
Components
1. Oil pump chain cover2. Oil pump sprocket3. Oil pump chain 4. Oil pump tensioner assembly5. Crankshaft oil pump sprocket6. Crankshaft RH chain sprocket7. RH Timing chain auto tension ...

See also:
Rheostat Repair procedures
Inspection
1.
Disconnect the negative (-) battery terminal.
2.
Remove the passenger compartment juction box cover.
3.
Remove the crash pad side switch assembly (A) by pushing it through ju ...
Smart key functions
1. Door lock
2. Door unlock
3. Trunk open
4. Alarm
With a smart key, you can lock or unlock a door (and trunk) and even start the
engine without inserting the key. Refer to the following, for mor ...
Description and Operation
Warning Lamp Activation
Warning Lamp Behavior after Ignition On
As soon as the operating voltage is applied to the SRSCM
ignition input, the SRSCM activates the warning lamp for a LED lamp
c ...
Categories
Hyundai Azera Manuals

© 2011-2026 Copyright www.hgmanual.com