
 Hyundai Azera: Seat Heater Repair procedures
Fifth generation HG (2011–2026) / Hyundai Azera 2011-2026 Service Manual / Body Electrical System / Seat Electrical / Seat Heater Repair procedures
Hyundai Azera: Seat Heater Repair procedures
Fifth generation HG (2011–2026) / Hyundai Azera 2011-2026 Service Manual / Body Electrical System / Seat Electrical / Seat Heater Repair procedures
Fifth generation HG (2011–2026) / Hyundai Azera 2011-2026 Service Manual / Body Electrical System / Seat Electrical / Seat Heater Repair procedures
| Inspection |
First Seat Heater
| 1. |
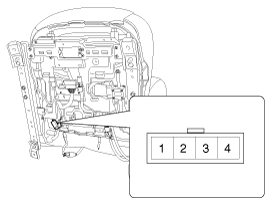
Check for continuity and measure the resistance between No.1 and NO.4 terminals.
|
| 2. |
Operate the seat heater after connecting the connector, and
then check the thermostat by measuring the temperature of seat surface.
|
| 3. |
Check for continuity between the terminals after disconnecting the connector. |
2nd Seat Heater
| 1. |
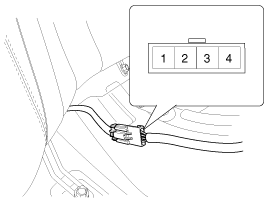
Check for continuity and measure the resistance between No.1 and NO.4 terminals.
|
| 2. |
Operate the seat warmer after connecting the 3P connector,
and then check the thermostat by measuring the temperature of seat
surface.
|
 Seat Heater Schematic Diagrams
Circuit Diagram
...
 Seat Heater Switch Schematic Diagrams
Circuit Diagram
...
See also:
Phone Menu Screen
Phone Menus
With a Bluetooth® Wireless Technology device connected, press the
key to display the Phone menu screen.
1) Favorite : Up to 20 frequently used contacts saved for easy access
2) Dia ...
Crankshaft Position Sensor (CKPS) Troubleshooting
Wave Form
...
Power Seat Control Switch Schematic Diagrams
Circuit Diagram
...
Categories
Hyundai Azera Manuals

© 2011-2026 Copyright www.hgmanual.com